Component Model Tutorial
With the Component Model API of WaaS, you can run components based on the WebAssembly Component Model.
While traditional WebAssembly modules were limited to numeric types for arguments and return values, the Component Model allows for more complex data types such as strings, lists, and structures to be exchanged.
This tutorial explains how to create a component using Rust and run it in Unity.
1. Installing Required Tools
Install the Rust toolchain and add the wasm32-unknown-unknown target.
rustup target add wasm32-unknown-unknown
2. Creating WIT
In the Component Model, you define types and function signatures in advance using an IDL called WIT (WebAssembly Interface Type).
First, create wit/sequence.wit under the root of your Unity project.
The following is an example of a WIT intended for use in a simple conversation scene:
package my-game:my-sequencer;

world sequence {
    import env;
    export play: func();
}

interface env {
    show-message: func(speaker: string, message: string);
}
world defines the set of functions to import and export for this WebAssembly component. interface env defines the set of functions to be implemented on the host environment side and imported into the component.
2. Creating Rust Source Files
To create a component in Rust, you need to generate bindings for Rust from the WIT file you created earlier. Use the tool wit-bindgen for this purpose. The usage varies depending on the language you are using, but this time we will introduce how to use it in Rust.
Create Assets/sequence_0.rs in any location under Assets.
use crate::my_game::my_sequencer::env::show_message;

wit_bindgen::generate!({
    path: "../../../../../wit",
    world: "my_game::my_sequencer/sequnce"
});

struct Sequence;

impl Guest for Sequence {
    fn play() {
        show_message("ぼく", "こんにちは!");
    }
}

export!(Sequence);
The wit_bindgen::generate! macro generates bindings from the WIT file.
wit-bindgen tries to find the WIT file relative to the Cargo.toml file actually located at Library/com.ruccho.waas/rust/crates/~~~/Cargo.toml when using WaaS, not the Rust source file. The path ../../../../../wit is used to refer to the project root from this Cargo.toml.
Refer to Using Rust Importer for more information.
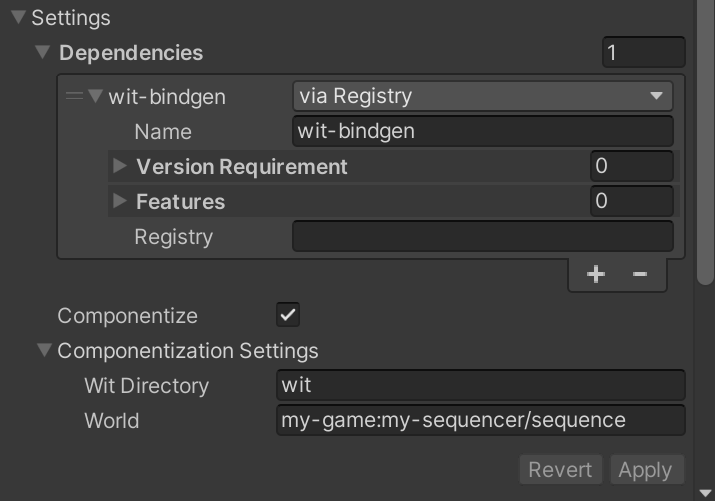
3. Importing and Configuring
Import the Rust source file you created earlier into Unity.

- Enable Crate Root
- Add a dependency "via Registry" under Dependencies and specify
wit-bindgenin Name - Enable Componentize
- Set the Wit Directory to
wit - Set the Component Name to
my-game:my-sequencer/sequence
- Set the Wit Directory to
Refer to Using Rust Importer for more information on the settings.
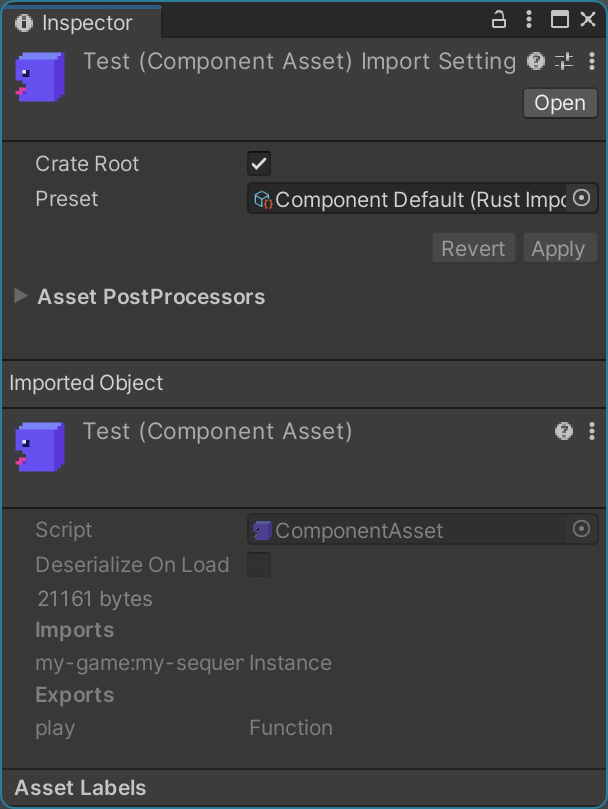
Click Apply to import. Once the compilation and componentization are complete, the component information will be displayed in the Inspector.

We can see that the function play is exported from the component.
4. Generating C# Bindings
To easily run the component you created, let's create C# bindings. WaaS provides a CLI tool called wit2waas that generates C# interfaces from the WIT file.
In the root of your Unity project, run wit2waas.
cargo install wit2waas
wit2waas --out "Assets/WaaS Generated"
It will generate the following C# code under Assets/WaaS Generated/my-game/my-sequencer from the WIT above:
// <auto-generated />
#nullable enable

namespace MyGame.MySequencer
{
    // interface env
    [global::WaaS.ComponentModel.Binding.ComponentInterface(@"env")]
    public partial interface IEnv
    {
        [global::WaaS.ComponentModel.Binding.ComponentApi(@"show-message")]
        global::System.Threading.Tasks.ValueTask ShowMessage(string @speaker, string @message);

    }
}
There are various attributes attached to the generated code, which allow the Source Generator to generate the code that actually exchanges values between the WebAssembly component and C#.
IEnv is an interface that defines the functions to be implemented on the host environment side. Then implement the IEnv.
internal class Env : IEnv
{
    public ValueTask ShowMessage(string speaker, string message)
    {
        Debug.Log($"{speaker}「{message}」");
        return default;
    }
}
5. Running the Component
Now it's time to run the component.
using System.Collections.Generic;
using MyGame.MySequencer;
using UnityEngine;
using WaaS.ComponentModel.Runtime;
using WaaS.Runtime;
using WaaS.Unity;

public class RunSequenceTest : MonoBehaviour
{
    [SerializeField] private ComponentAsset componentAsset;

    private async void Start()
    {
        var component = await componentAsset.LoadComponentAsync();
        var instance = component.Instantiate(new Dictionary<string, ISortedExportable>()
        {
            { "my-game:my-sequencer/env", IEnv.CreateWaaSInstance(new Env()) }
        });
        using var context = new ExecutionContext();
        var sequence = new ISequence.Wrapper(instance, context);
        await sequence.Play(); // ぼく「こんにちは!」
    }
}
Attach RunSequenceTest to a GameObject and assign the imported component to Component Asset.
Now you can run the component in Unity.